Adding Content
Course materials posted in content modules can include documents, images, media files, URL links, and existing course activities. The guides on this page are divided into two categories: Adding content in the Classic Content Experience and adding content in the New Content Experience.
On this page:
- Adding Content in the Classic Content Experience (CCE)
- Guide: Uploading a File (CCE)
- Guide: Creating a File (CCE)
- Guide: Creating a Link (CCE)
- Adding Content in the New Content Experience (NCE)
- Guide: Uploading a File (NCE)
- Guide: Creating a File (NCE)
- Guide: Creating a Link (NCE)
CCE = Classic Content Experience
NCE = New Content Experience
Adding Content in the Classic Content Experience (CCE)
Follow the guides below for the specific type of content you want to upload or link within your module.
Uploading a File (CCE)
Word, PDF, PowerPoint, HTML, and image files will all display directly within D2L. To retain formatting and ensure proper display, we recommend saving documents as PDF files before uploading to D2L including Word documents and PowerPoint presentations. PowerPoint presentations with narration will not work in D2L. For PowerPoint presentations with narration, we recommend saving the presentation as an MP4 video file or using a multimedia program with screen capture to create the narrated PowerPoint such as Kaltura Capture. Other files can be uploaded to D2L but students would need to download the file and open with the appropriate software program.
 Guide: Uploading a File
To add documents such as PDF or Word files to a module in your course using the Classic Content Experience:
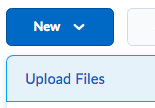
- Click on the content module where you want the file located.
- Select New then choose Upload Files from the drop-down list.
- Select My Computer.
- In the Add a File window, select Upload to browse and locate your file, or drag and drop your file into the box.
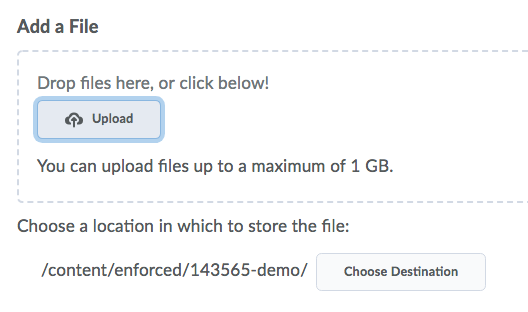
- After the file has been uploaded, select Add.
- The filename will be the title of the link you just created. We recommend changing the title of the link if necessary to make it easier for students to identify.
To change the title of the link,
Creating a File (CCE)
Guide: Creating a File
To create a new file in a module in your course using the Classic Content Experience:
- Click on the content module where you want the file located.
- Select New then Create a File.

- Enter a title for the page. The title will be the title on the link to that file.

- Enter the content for your page by either copying and pasting or typing the content in the main body of the html editor. Format the text if necessary using the formatting tools. Images can also be inserted. The underlining tool should not be used. Text on a webpage should only be underlined if it is a hyperlink.
- When finished, select Save and Close.
Creating a Link (CCE)
Creating a Link
To add a link to a webpage or another web resource to a module in your course using the Classic Content Experience:
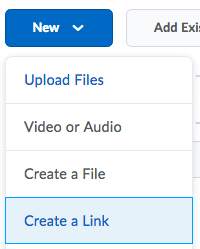
- Within the module, select New then Create a Link.
- Insert the Title and the URL (web address) for the page to which you want to link.

- Select the check box if you want the page to Open as External Resource. This will open the link in a separate tab in the browser.
- Select Create.
Adding Content in the New Content Experience (NCE)
Follow the guides below for the specific type of content you want to upload or link within your module (unit).
Uploading a File (NCE)
Word, PDF, PowerPoint, HTML, and image files will all display directly within D2L. To retain formatting and ensure proper display, we recommend saving documents as PDF files before uploading to D2L including Word documents and PowerPoint presentations. PowerPoint presentations with narration will not work in D2L. For PowerPoint presentations with narration, we recommend saving the presentation as an MP4 video file or using a multimedia program with screen capture to create the narrated PowerPoint such as Kaltura Capture. Other files can be uploaded to D2L but students would need to download the file and open with the appropriate software program.
Guide: Uploading a File
To add documents such as PDF or Word files to a module (unit) in your course using the New Content Experience:
- Click on the content module (unit) where you want the file located.
- Select Add Existing.

- Drag and drop your file into the box or select browse and locate your file.

- After the file has uploaded, the link will be created in the left navigation.
- The filename will be the title of the link. We recommend changing the title of the link if necessary to make it easier for students to identify.
To change the title of the link,- Select the Action menu (three dots) to the right of the Create New button then select Edit from the drop-down list..
- Make the necessary changes to the name, then select Save and Close.
- New content is hidden by default. Select the Hidden button above the file to make it visible.

Creating a File (NCE)
Guide: Creating a File
To create a new file in a module (unit) in your course using the New Content Experience:
- Click on the content module (unit) where you want the file located.
- Select Create New.

- Select HTML Document.

- Enter a name for the page. The name will be the title on the link to the file.

- Enter the content for your page by either copying and pasting or typing the content in the main body of the html editor. Format the text if necessary using the formatting tools. Images can also be inserted. The underlining tool should not be used. Text on a webpage should only be underlined if it is a hyperlink.
- When finished, select Save and Close.
- New content is hidden by default. Select the Hidden button above the file to make it visible.
Creating a Link (NCE)
Creating a Link
To add a link to a webpage or another web resource to a module (unit) in your course using the New Content Experience:
- Click on the content module (unit) where you want the file located.
- Select Create New.
- Select Weblink.

- Insert the Name and the Link (web address) for the page to which you want to link.

- Select the button for the Display Options to indicate if you want the webpage embedded on the page or open in a new tab.
- Select Save and Close.
- New content is hidden by default. Select the Hidden button above the webpage to make it visible.
The written instructor guides and video simulations on the D2L Solutions site are developed and brought to you by the
Faculty Development and Innovation Center
phone 217-581-7051 :: email fdic@eiu.edu :: web www.eiu.edu/fdic
Contact the FDIC for questions about the guides, to suggest topics for new guides, or to schedule a consultation appointment. The FDIC staff can recommend integration solutions using D2L and other instructional technologies for your online, hybrid, and face-to-face courses.
For Help with D2L Brightspace
Send your request for assistance to fdic_help@eiu.edu and an FDIC staff member will assist you.