In this section, we will show how python can be used to access and load data files, query layer attributes, make shapefiles and finally perform geoprocessing operations.
1. To begin, your qgis project should be open with the crime and neighborhood layers added.
2. Open Python Console
- Main Menu >> Plugins >> Python Console
3. Try some basic code.
Type these in one line at a time in the console at the prompt (">>>") and press enter (note: beginning of third statement is a TAB):
           >>> layer=iface.activeLayer()
           >>> for field in layer.pendingFields():
           >>>     print field.name()
You should see a list of field names.
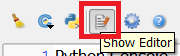
4. Click the button to show the Python Editor:
5. Before writing any code, save your script to a file location of your choice:

Use this button to save your work often.
6. Import the QGIS Processing Library
Start by writing the following code to import the QGIS processing library:
# import QGIS processing library
import processing
7. Load data files into the script.
For the following code, be sure to change the data folder (and shapefile names if necessary) to reflect their locations on your computer.
# Load data files
datafolder=r'C:\qgisworkshop\data'                              #change to your data folder
crimefile='{}\{}.shp'.format(datafolder, 'crimes')             # crimes shapefile
nbfile ='{}\{}.shp.format(datafolder, 'neighborhoods')    # neighborhoods shapefile
crimelayer=QgsVectorLayer(crimefile,"crime","ogr")
nblayer=QgsVectorLayer(nbfile,"neighborhoods","ogr")
8. Make sure that the data loaded properly:
Add the following code:
# Make sure files are loaded
if crimelayer.isValid():
    print "Crime layer loaded successfully."
else:
    print "Crime layer failed to load!"
if nblayer.isValid():
    print "Neighborhood layer loaded successfully"
else:
    print "Neighborhood layer failed to load!"
Then run your script by clicking the play ("Run Script") button. You should see messages confirming that your data loaded correctly. If not, go back and check your data folder and file names.
9. Get unique crime types
Add the following code:
# get unique crime types
crimetypes=[ ]
for feature in crimelayer.getFeatures():
    thistype=feature['CrimeType']
    if not thistype in crimetypes:
        crimetypes.append(thistype)
10. Make sure the crime types were found
Add the following code:
print "Found {} types of crime.".format(len(crimetypes))
11. Make separate shapefiles for each crime type with >50 crimes
Lastly, we'll create a loop to look at each crime type and:
- Filter the crimes layer to that type
- Count the number of crimes
- Check that the count is greater than 50
- If so, save to a new shapefile in the input data folder
To do this, add the following code:
# Main Loop
for crimetype in crimetypes:
    # select crimes of each type and count
    expr=' "CrimeType"=\'{}\'  '.format(crimetype)
    crimelayer.selectByExpression(expr)
    count=crimelayer.selectedFeatureCount()
    # report feedback
    print expr
    print "{} features selected.".format(count)
    # save if there are more than 50 crimes
    if count > 50:
        # get name of output file
        outfile=r'{}\{}.shp'.format(datafolder,crimetype)
        # write output file (this is all one line)
        _writer = QgsVectorFileWriter.writeAsVectorFormat(crimelayer, outfile,"utf-8",None,"ESRI Shapefile", True)
        # add to map
        result=iface.addVectorLayer(outfile,crimetype,'ogr')
12. Further Steps
In QGIS, common geoprocessing operations are accessed through the geoprocessing module. To import this module, enter the following command in the console:
>>> import geoprocessing
To see a list of geoprocessing operations containing the word "join", enter the following:
>>> processing.alglist('join')
You should see an operation called "joinattributesbylocation". To get help on this function, enter the following:
>>> processing.alghelp("qgis:joinattributesbylocation")
This is a starting point for many advanced scripts using QGIS.
Here is the complete script for saving shapefiles of each crime type with >50 crimes:
# import QGIS processing library
import processing

# Load data files
datafolder=r'C:\...\QGIS_workshop_2016\data'
crimefile='{}\{}.shp'.format(datafolder,’crimes’)
nbfile='{}\{}.shp'.format(datafolder,’neighborhoods’)
crimelayer=QgsVectorLayer(crimefile,"crime","ogr")
nblayer=QgsVectorLayer(nbfile,"neighborhoods","ogr")

# Make sure files are loaded
print 'Crimes loaded: {}'.format(crimelayer.isValid())
print 'Neighborhoods loaded: {}'.format(nblayer.isValid())

# get unique crime types
crimetypes=[]
for feature in crimelayer.getFeatures():
    thistype=feature['CrimeType']
    if not thistype in crimetypes:
        crimetypes.append(thistype)

# Make sure we got at least a few crime types
print "Found {} types of crime.".format(len(crimetypes))

# Main Loop
for crimetype in crimetypes:
    # select crimes of each type and count
    expr=' "CrimeType"=\'{}\'  '.format(crimetype)
    crimelayer.selectByExpression(expr)
    count=crimelayer.selectedFeatureCount()
    # report feedback
    print expr
    print "{} features selected.".format(count)
    # save if there are more than 50 crimes
    if count > 50:
        # get name of output file
        outfile=r'{}\{}.shp'.format(datafolder,crimetype)
        # write output file (this is all one line)
        _writer = QgsVectorFileWriter.writeAsVectorFormat(crimelayer, outfile,"utf-8",None,"ESRI Shapefile", True)
        # add to map
        result=iface.addVectorLayer(outfile,crimetype,'ogr')