PeerMark Assignments in D2L Brightspace
Instructor Guide
PeerMark is a peer review assignment tool. Instructors can create and manage PeerMark assignments that allow students to read, review, and evaluate one or many papers submitted by their classmates. With the advanced options in PeerMark instructors can choose whether the reviews are anonymous or attributed.
The basic stages of the peer review process:
- Instructor creates a Turnitin paper assignment using the Turnitin for Peermark external learning tool in D2L.
- Instructor creates the PeerMark portion of the assignment and sets the number of papers students will be required to review, and creates free response and scale questions for students to respond to while reviewing papers.
- Students submit their papers to the assignment.
- On the PeerMark start date, students begin writing peer reviews.
- For each assigned paper, students write reviews by responding to the free response and scale questions.
- Students receive reviews when other students complete them.
- Once the PeerMark assignment due date passes, no more reviews can be written, completed, or edited by the writer
On this page:
- PeerMark Video Demonstration from Turnitin
- Guide: Creating a PeerMark Assignment in D2L Brightspace
- Guide: Editing a PeerMark Assignment
- Guide: Deleting a PeerMark Assignment
- Guide: The PeerMark Assignment Inbox
- Additional PeerMark Tutorials
PeerMark Video Demonstration from Turnitin
Demonstration of creating a Turnitin PeerMark assignment in D2L Brightspace. Demonstration conducted by Chris Vescovi, Implementation Consultant, Professional & Educational Services (HED), Turnitin.
Creating a PeerMark Assignment in D2L Brightspace
 Guide: Creating a PeerMark Assignment in D2L Brightspace
 Guide: Creating a PeerMark Assignment in D2L Brightspace
PeerMark assignments are created in a Content module in D2L Brightspace as an external learning tool. PeerMark assignments are NOT created in an assignment dropbox as with a traditional Turnitin assignment.
Creating the assignment is a two-part process.
Step 1: Create the Assignment
- Log in to D2L Brightspace at https://www.eiu.edu/d2l using your EIU net ID and password.
- Enter the D2L course in which you want to create the PeerMark assignment.
- Select Content in the course navigation.
- Select an existing content module or create a new content module in which you want the PeerMark assignment to be linked.
- Add an existing activity:
If using the Classic Content Experience in D2L,
- select Add Existing Activities
- then Turnitin for Peermark.
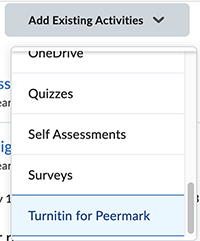
If using the New Content Experience in D2L,
- select Add Existing
- then Turnitin for Peermark.
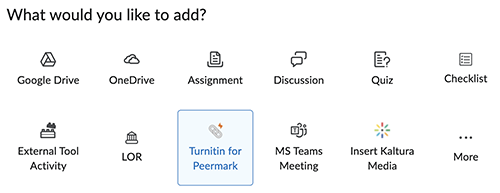
- In the Turnitin for Peermark pop-up window, complete the form fields for the assignment. These settings are for the initial assignment submission. (i.e. Students submitting their written paper)
- Title: Provide a title for your assignment.
- Instructions: Provide instructions for completing and submitting the assignment.
- Max grade: Set a maximum point value for the assignment to allow a grade to be sent to the grade book if the paper is to be graded. (The grade item will be created automatically.)
- Start date: The start date is the date and time students can begin submitting to the assignment.
- Due date: The due date is the date and time students' papers are due for the assignment.
- Feedback release date: The feedback release date is the date and time students can begin viewing the comments and grades after you have graded their papers.
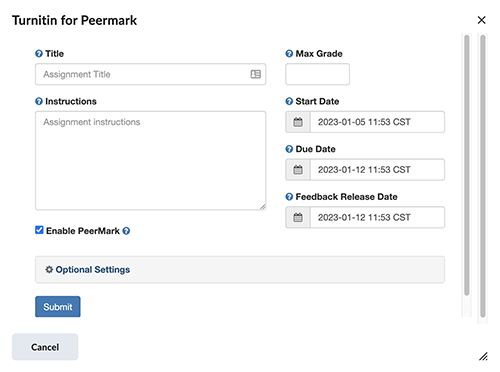
- Select the checkbox to Enable PeerMark.
- Select Optional Settings if you want to edit any of the default Turnitin settings.
- For more information on the optional settings, go to Optional LTI settings.
- Select Submit. (If you opened the Optional Settings, you will need to scroll to the bottom of the Turnitin for Peermark pop-up window to see "Submit".)
Step 2: Set Up Peermark
- Open the link for the assignment you created to access the assignment inbox.
- Select the PeerMark tab then select PeerMark Setup.

- Use the guidance below to set up the PeerMark portion of the assignment.
- Maximum points available: This is the maximum points available to your students for completing the review if points are to be awarded. NOTE: The students will see this score for the review in the assignment but the score does not transfer to the grade book. If you want points posted in the grade book for the review, you will need to add the scores manually to the grade book.
- Students can review from: The start date of the Peermark review. Students can begin their peer review on this date and work on them until the "Students can review until" date.
- Students can review until: This is the date and time students' reviews are due.
- Peer feedback available from: This is the date and time students can begin viewing the comments and marks left by their peers. Feedback can only be released after the 'Students can review until' date has passed.
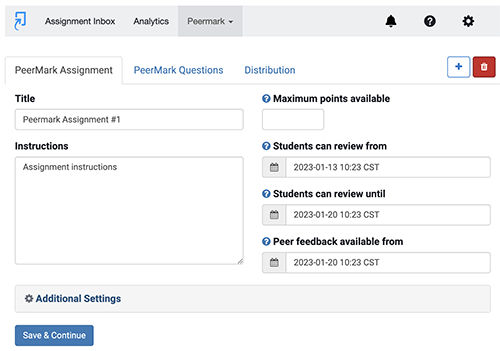
- Select Additional Settings to view and modify advanced PeerMark assignment settings. The information below will help you to understand the settings available and customize the assignment.
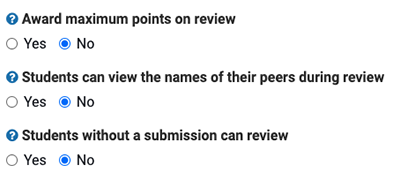
- Award maximum points on review: This relates to the point value you've set for the review. If you choose Yes, your students will receive the full point value for reviewing their peer's paper.
- Students can view the names of their peers during review: By choosing Yes, students will see the name of the author whose paper they are reviewing, as well as the names of the students who wrote the reviews for their papers. Choose No to make this information unavailable to your students.
- Students without a submission can review: This is the non-submitter participation option. By choosing Yes, students who have not submitted papers to the paper assignment on which your PeerMark assignment is based can still write reviews for other students' papers. Choose No to disallow non-submitter participation.
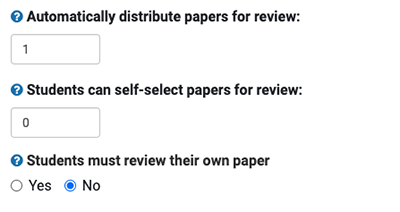
- Automatically distribute papers for review: PeerMark can automatically assign papers to the students in your class. Enter a value to distribute a specific number of papers to each student. Enter 1 as a minimum. You can force pair your students' papers via the Distribution tab.
- Students can self-select papers for review: Enter a value to allow a specific number of papers to be selected by each student. If you prefer that students do not have this option, enter 0.
- Students must review their own paper: By choosing Yes, students will be required to write a review on their own paper after they complete all other assigned reviews.
- Select Save & Continue
- Select the PeerMark Questions tab to add or create questions for the PeerMark review.
- There are two ways to add PeerMark questions to an assignment:
- by adding previously used questions from the PeerMark library or
- by creating new PeerMark questions.

- How to Add Questions
- There are two ways to add PeerMark questions to an assignment:
- Select the Distribution tab to begin assigning papers to students for review or to view how papers have been distributed or to exclude students from pairing.
- Distribution Tutorials
Editing a PeerMark Assignment
 Guide: Editing a PeerMark Assignment
 Guide: Editing a PeerMark Assignment
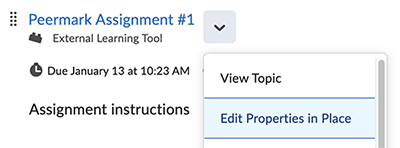
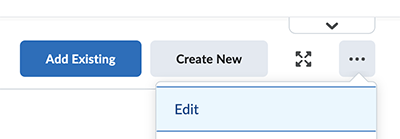
To edit the assignment Title, Instructions, Start Date or Due Date:
|
If using the Classic Content Experience in D2L:
|
If using the New Content Experience in D2L:
|
To edit the Max Grade or Feedback Release Date:
- Open the link for the assignment to access the assignment inbox.
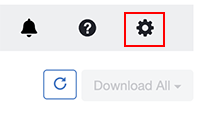
- Select the Settings Menu (gear icon) in the upper right corner of the assignment inbox.
- Make any necessary changes to the Max Grade for the assignment or the Feedback Release Date.
- Select Submit.
- Select the Assignment Inbox tab to return to the assignment inbox.
Deleting a PeerMark Assignment
 Guide: Deleting a PeerMark Assignment
 Guide: Deleting a PeerMark Assignment
- Open the link for the assignment to access the assignment inbox.
- Select the PeerMark tab then select PeerMark Setup.

- Select the Delete button then select Confirm.
- After you have deleted the assignment, you will want to delete the assignment link from your course.
The PeerMark Assignment Inbox
 Guide: The PeerMark Assignment Inbox
 Guide: The PeerMark Assignment Inbox
The PeerMark assignment inbox lists all of the students within the course and displays the number of reviews received or submitted.
To access the PeerMark assignment inbox
- Select the PeerMark drop-down menu
- then select PeerMark Reviews.

Elements of the PeerMark Assignment Inbox:
- Student: The name of the student included in the PeerMark assignment (if you have excluded any students from the PeerMark assignment during PeerMark setup, the student will not appear in the PeerMark assignment inbox).
- Grade: A PeerMark review can automatically receive the maximum points available upon submission of a review (set in PeerMark settings), or you can manually provide a grade in PeerMark.
- Submitted: If a student has submitted a review, their number of reviews will become clickable with a gray background. Click this number to view the student's submitted reviews.
- Received: If a student has received a review, the number of reviews received will become clickable with a gray background. Click this number to view the student's received reviews.
- Review: As an instructor, you can leave a review on your student's paper. Click the blue pencil button to start a new review or click the green pencil and paper button to resume a saved review.
Additional Tutorials:
- Accessing PeerMark Reviews
- Writing an Instructor Review
- Writing a Review for a Selected Paper
- Grading Peer Reviews
- Using the PeerMark tools Palette
- Adding Bubble Comments
- Adding Inline Comments
- Adding Composition Marks
- Allowed File Types and Sizes
- Digital Receipts after Submission
Resource:
The written instructor guides and video simulations on this site are brought to you by the
Faculty Development and Innovation Center
phone 217-581-7051 :: email fdic@eiu.edu :: web www.eiu.edu/fdic
Contact the FDIC for questions about the instructor guides, to suggest topics for new guides, or to schedule a consultation appointment. The FDIC staff can recommend integration solutions using Turnitin and other instructional technologies for your online, hybrid, and face-to-face courses.
For Help with Turnitin
Send your request for assistance to fdic_help@eiu.edu and an FDIC staff member will assist you.
